Raspberry Pi controlled kiln (part 2)
In my previous post on making a raspberry pi controlled kiln I reached the point with a script running on my Raspberry PI to measure the temperature and manually switch on and off the kiln. On a first attempt I wasn’t able to make the master repo of jbruce (2024-04-04) work with my set up. Still some steps to make!
Safety notice
This project involves mains voltage (230V) and high temperatures. If you are building a similar setup, please be aware of the following:
- Solid State Relays (SSRs) fail closed. When an SSR breaks, it fails in the ON state. This means your kiln will keep heating and your controller cannot stop it. Always add a mechanical contactor (DPST) upstream of the SSR as a safety disconnect.
- SSRs have leakage current. Even when switched off, an SSR passes a small current (1.5-10 mA). Your heating elements are never fully de-energized as long as the kiln is plugged in.
- Add an emergency stop. A physical emergency stop button (in series with the contactor coil) allows you to cut all power independently of your Raspberry Pi and software.
- Firebricks absorb moisture. Damp firebricks conduct electricity, causing leakage current between elements and kiln casing. Store your kiln indoors and do a slow initial ramp (hold at 100-200 degrees C) after longer storage periods to drive out moisture.
My original setup used only an SSR with no mechanical backup. Thanks to valuable feedback from Dawson on part 1, I now recommend adding a DPST contactor and emergency stop to any DIY kiln controller. Commercial kilns by Skutt and L&L all use multiple independent safety layers for good reason.
In the meanwhile I discovered on the web old forums and posts using the same repo for making a kiln controller. For instance in this thread on ceramicartsdaily.org Jason (jbruce) describes and discusses the steps in the process of making the kiln-controller. It’s lovely to see such a supporting network of ceramic enthousiastic people collaborating together to make it work.
Finding a solution for the MAX31856 thermocouple issue
In the same thread some people are sharing their struggles with a MAX31856 and a K-type thermocouple to run the kiln-controller. This could mean a few things:
Either I:
- need to adjust the code of the kiln-controller with my setup;
- need to look for alternative repos;
- need to find a fork or branch on github.com with working configurations for my setup.
Adjusting the code in the kiln-controller means quite some time investigation, which I don’t have. So this option was for me less doable.
Checking other alternative kiln controllers on github led me to quite some interesting projects:
- https://github.com/CurlyTaleGamesLLC/PyKiln : Great code, different setup with ESP32, no RPi. Not recently updated.
- https://github.com/JoshOlds/Kilncontroller : Matches the MAX31856, userbase not so big at the moment. Not recently updated.
- https://github.com/williamolyolson/pikiln : Doesn’t match the MAX31856, userbase not so big at the moment. Not recently updated.
- https://github.com/daharoni/kilnpi : Great code, doesn’t match the MAX31856, recently updated.
The repo by daharoni looks promising, though I need to work a bit to make the MAX31856 working. I will check the branches and forks on jbruce12000 repo first to see if there are other options. Nevertheless the code by daharoni is worth a try lateron.
Third option is to check the different forks and branches based on jbruce12000 resulted in following the traces of a group hardworking people with interesting progressions. I checked in the github network view which fork was recently contributed and matches the MAX31856. Most of the stablest forks depend on MAX31855 rather than the MAX31856.
One other option is to check the branches in jbruce12000 repo. Besides the master, there is also
| Branch | Updated | Behind | Ahead | Pull request |
| master | 2 years ago | Default | Default | |
| blinka | 5 months ago | 2 | 112 | |
| heating-rate | 2 years ago | 2 | 85 | #127 |
| kiln-profiles | 2 years ago | 14 | 0 | |
| python3 | 5 years ago | 208 | 0 |
The most recently updated branch is the blinka, with 112 commits ahead of the default master trunk. Also from the previous article I recognise the blinka library for the RPi, because it made the temperature measurements from the MAX31856 with the K type thermometer and the RPi work. This is a promising branch.
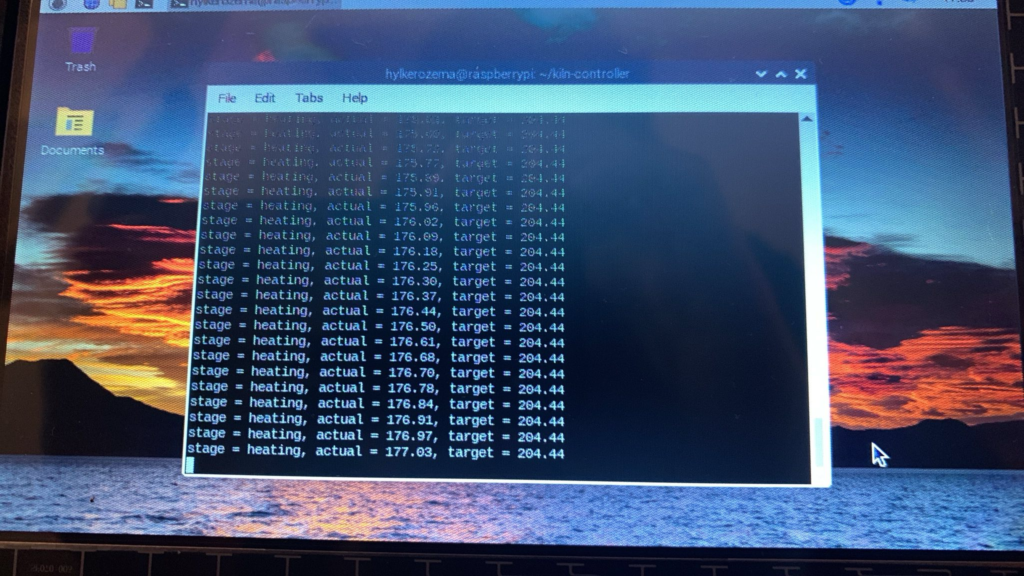
In this branch the ./test-thermocouple.py, ./test-output.py and ./gpioreadall.py are helpful scripts to check the wiring and working of the MAX31856 thermocouple. A quick test of the code showed good temperature readings. So I decided to use this branch.
Installing the blinka version of kiln-controller
The steps to install the blinka version of the kiln-controller are well described on kiln-controller/README.md
To make sure that I used the blinka branch I directly downloaded the zip file and followed the steps described. The next step is to wire the SSR and the transistor for making the SSR switch on and off according to the logic.
Wiring the transistor and SSR
This is the documentation for the BC547B NPN transistor to switch the Solid State Relay on or off.
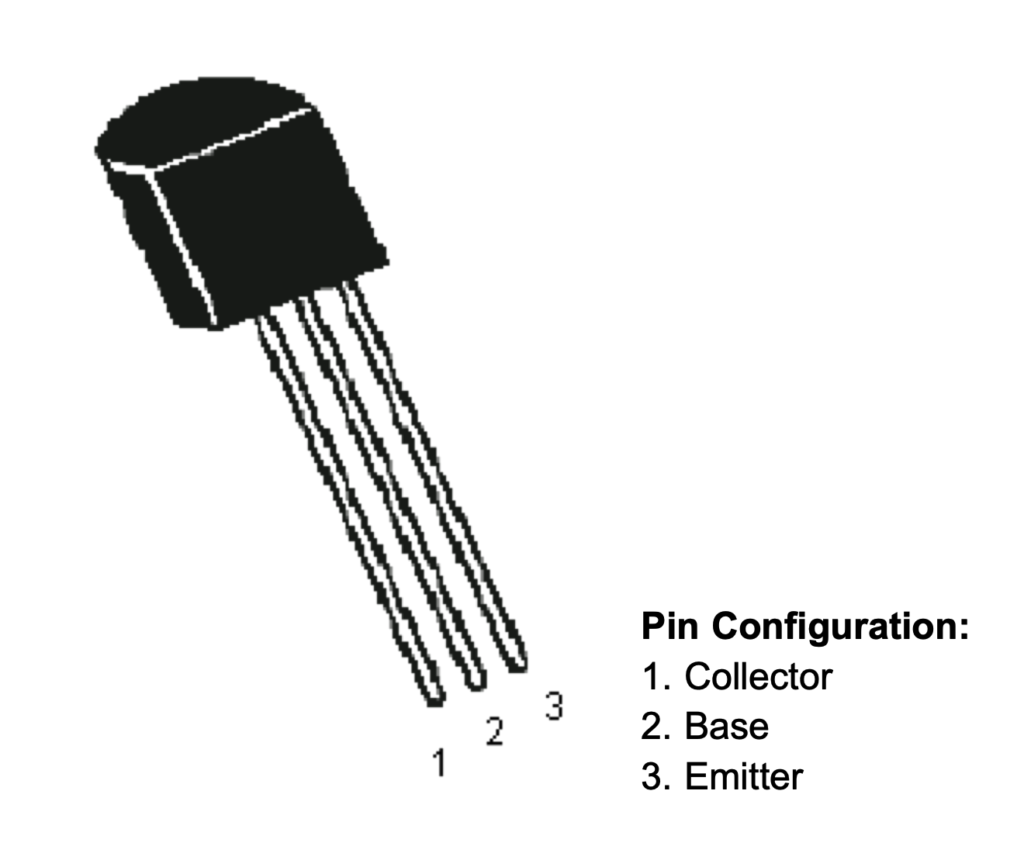
Pin configuration with the collector, base and emitter pin
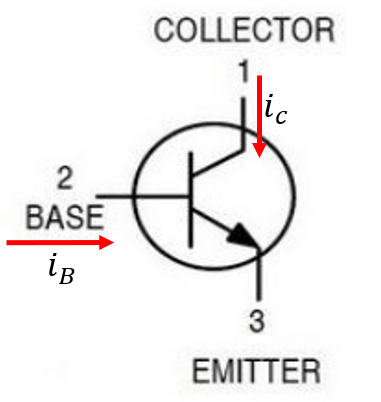
BC547B NPN transistor schematically.
With the transistor and SSR with fan connected the whole testwiring looks like this:
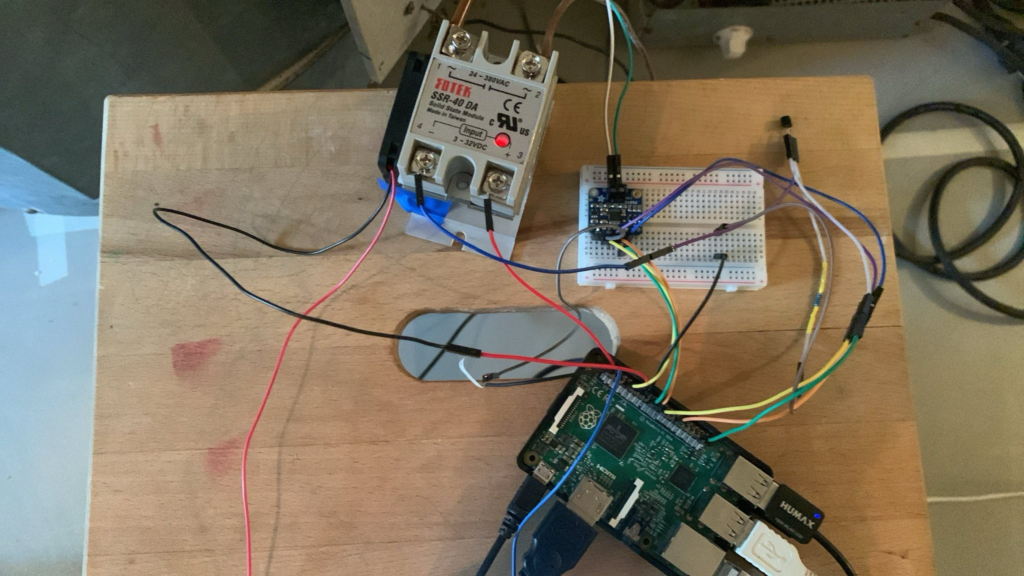
I will add a wiring scheme later when it has passed the testing stage.
To have the optimum way of heatingcurve compared to the scheduled profile it’s neccessary to run the kiln-tuner and fill in the PID values in the config.py file. Running the kiln-controller/kiln-tuner.py takes a while and runs smoothly.
With the PID values being tuned in I am up for a small video to show how far I have reached until this point:
Next step is still testing and then making a testrun with the PID values.
I had the setup working and when starting the first live run. it did not work. Dismantled everything. Later found the issue is I switched to WIFI, this disturbed the temperature readout of the thermocouple. Never build it unfortunate. Good luck!
Dear Richard, Thanks for sharing your experiences. I have built and did several heating runs. It seems to run smoothly now with Blinka. I made some improvements in the meanwhile and will write a post on these. It’s an exiting activity to create stuff and use my IT skills. Let’s stay in contact and anyway you can contact me if you want to pick up building such a project yourself.
Would there be more follow ups to this article here?
Although I usually manage through electronic challenges, I am not savvy with Raspberry Pi. I have completed the hardware setup and connected the system to my test kiln. The copy/paste of the suggested ” test ” codes ( with slight edits * ) bring back results in Terminal window as readout of my kiln thermocouple and simulations pretending a functional set up.
The included ” Read Me ” file in jBruce12000 repository is written for experienced users. A novice beginner ( me ) gets lost in practical stages. My request for a beginner step-by-step user manual on that Git was dismissed.
Could you writeup a simple bullet point list of actions to implement in order the get software running please?
Hi Max, apologies for the very late reply. Your comment sat in my moderation queue for far too long.
It’s great that you have the hardware working and can read thermocouple values. That’s actually the hardest part done. You’re right that the jbruce12000 README assumes quite a bit of
Linux/Raspberry Pi experience.
I’ll put a beginner-friendly step-by-step software setup guide on my writing list. In the meantime, feel free to reach out via my contact page if you’re still working on this. Happy
to help you get past the practical hurdles.